Installing Windows (2000, XP, 2003, Vista, Windows 7) can be done by using a USB drive, if your laptop’s CD drive or desktop computer’s CD drive is not working. The original method and software, to use a USB drive to setup Windows on a computer, is not the work of this site (credit goes to this guide and the original forum entry).
But below, the step-by-step instructions are the work of this site, and hopefully they are more simplified and in greater detail than elsewhere. There are other ways to do this, but this method is a simple and straightforward way to install Windows from a USB drive.
What You Need To Install Windows From a USB Drive
This is what you need to install Windows from a USB drive
- USB drive (minimum 1 GB capacity)
- Original Windows Setup CD (Windows 2000, Windows XP, Windows 2003, Windows Vista, Windows 7)
- Source Computer (Computer-1) >> A computer with a working CD drive for copying files from the Windows CD to the USB drive.
- Destination Computer (Computer-2) >> The computer to be formatted and that will have Windows installed on it. It must be able to boot off of a USB drive.
- WinSetupFromUSB program >> Free software to transfer the files from the Windows CD to the USB drive (download the latest stable version here, version 0.2.3).
How To Install Windows from a USB Drive with WinSetupFromUSB
The instructions below refer to Computer-1 and Computer-2, as described above.
For Computer-1 – Copying files to USB drive from Windows Setup CD:
- Download WinSetupFromUSB and install on Computer-1. The installation should create a shortcut on your desktop.
- Insert the Windows Setup CD (do not run the CD).
- Insert the USB drive. Check the USB drive contents and backup any files you want to keep to your computer.
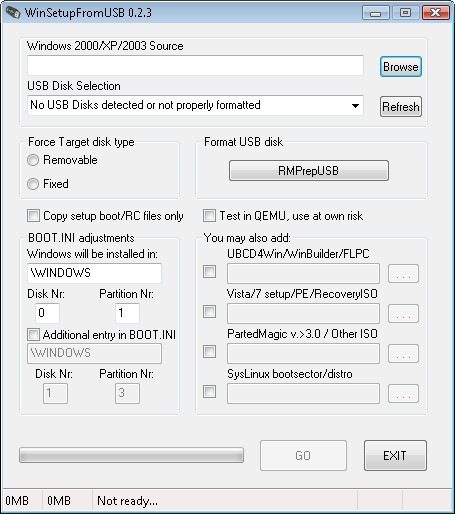
- Run WinSetupFromUSB.

- For “Windows 2000/XP/2003 Source”, click browse and select the CD drive containing the Windows CD.
- For “USB Disk Selection”, select the USB drive you wish to use to install Windows.
- For “Force Target Disk Type”, select “Fixed”.

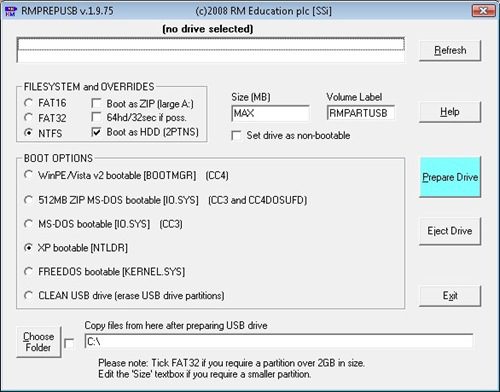
- Click the button “RMPrepUSB” under “Format USB Disk”. A new window will open up for the formatting utility RMPrepUSB.

- In the RMPrepUSB window,
- Select the USB drive you want to format and will use to install Windows.
- Under “FILESYSTEM and OVERRIDES”, select “NTFS” and “Boot as HDD”.
- Under “BOOT OPTIONS”, select “XP Bootable [NTLDR]”.
- Click “Prepare Drive”.
- When finished, exit RMPrepUSB.
- Back in the WinSetupFromUSB window, click “GO” to begin copying setup files from the Windows CD to your USB drive.
- When finished, click “EXIT”.
For Computer-2 – Installing Windows from the USB drive:
- Check that Computer-2 is able to boot off of a USB drive. Enter the system BIOS as the computer starts up (press F5, F8, F12 or some other function key). Which key to press is displayed on the screen during boot up and depends on your specific computer. In the boot sequence settings, make sure that your computer will try to boot off of the USB drive first, before trying to boot from the hard drive.
- Insert the USB drive in Computer-2.
- Turn on Computer-2 to boot off of the USB drive.
- The USB drive will load “GRUB4DOS” which shows one option: “Windows XP/2000/2003 Setup – First and Second Parts”. This option will be automatically selected after a few seconds, or you can press “Enter” to continue.
- The next screen will show two options. Select the first option. The exact options will depend on the version of Windows you are installing. For example, for Windows XP Professional, select: “First part of Windows XP Professional setup”. This option will be automatically selected after a few seconds, or you can press “Enter” to continue.
- The first part of the Windows installation will begin. Follow the onscreen instructions of the Windows setup.
- After the first part of the Windows installation finishes, the USB drive will load “GRUB4DOS” showing two options. Select the second option. For example, for Windows XP Professional, select: “Second part of Windows XP Professional setup”. This option will be automatically selected after a few seconds, or you can press “Enter” to continue.a. If getting an error message regarding “HAL.DLL/NTOSKRNL.EXE” not found, then some other options will appear onscreen. Try and select each option until one of them works. Press “Enter” to continue after you select.
Please select the operating system to start:
Second part of XP Professional setup from hd 0 part 1
———————————-
Try entries below if getting HAL.DLL/NTOSKRNL.EXE not found errors
———————————-
Second part of XP Professional setup from hd 0 part 2
Second part of XP Professional setup from hd 0 part 3
Second part of XP Professional setup from hd 0 part 4
Second part of XP Professional setup from hd 1 part 1
Second part of XP Professional setup from hd 1 part 2
Second part of XP Professional setup from hd 1 part 3 - The second part of the Windows installation will begin. Follow the onscreen instructions to complete the Windows installation.
Windows should now be installed on your computer. When the USB drive is not actively in use by your computer, you will want to remove it to avoid booting with the USB drive again. Also, the next time you restart your computer, you may want to restore the settings in your system BIOS, so that the computer will no longer try to first boot from the USB drive.


